Posts

Showing posts from August, 2022

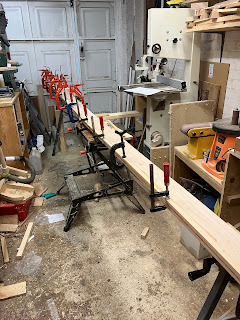
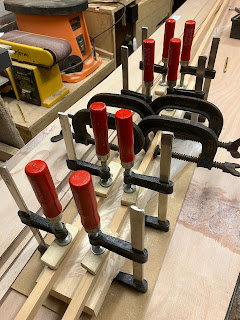
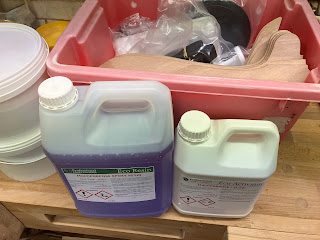
Starting with the 'glue' part of stich and glue.

Image
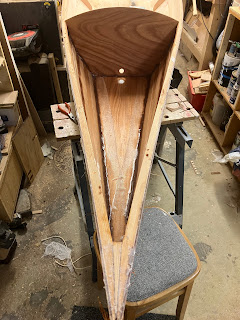
Here is the bow section of the boat coated with its fillets of epoxy, glass tape and then a coat of clear epoxy. The actual gluing stuff went pretty well, but I had a near disaster when mixing up some of the epoxy. The pump on the resin dispenser collapsed through into the container so I was left with a sticky mess and not enough hands to deal with it...I was really glad I was wearing gloves! I managed to fix it, but it isn't holding the seal very well and needs re-priming after each use. The last photo shows the rear bulkhead. This came in the kit with a routed hole for a screw in hatch, but as I am going for deck hatches, I filled it in with epoxy (and drilled a little hole for a drain plug). It will get a coat of paint in due course.  

All wired up

Image
 All the panels wired together and ends of the sheer camps glued. Mistake 2...I trimmed these before making sure that the beam was the correct 33 inches, so had to make a couple of small wedges to infill. I also had to take the table off my bandsaw to make enough room... I had some fun with time lapse on my phone too...

1st mistake

Image
 I should have known. Some of the epoxy seeped in between the two sheer panels and ended up a bit stuck together. When I prised them apart some of the wood tore away (particularly around the puzzle joints). I mixed up some epoxy and wood flour to fill the holes - As I am going to paint the hull below the deck, it shouldn't matter too much, but there is a lesson to learn...

Sheer clamps

Image
The bottom and bilge panels have been moved temporarily to the shed (5m long bits of 4mm ply are a bit lively in a gust of wind) , and I have glued on the sheer clamps. It needed all my clamps, and every inch of space, including the end cupboard... Afterwards I had to crawl underneath to escape.  

Scarfing

Image
  The 'bilge' and 'sheer' panels are now done and I am now joining together the sections of 'sheer clamps'. I will run out of space to make these at their full length, so will need trim them down a little just to be able to join them in the garage. Once done, they will be glued to the the 'sheer panels'. Given the tight space and the fact that it takes 24 hours for the epoxy to cure, it is proceeding only slowly (which is a bit frustrating). Hopefully once the boat is wired together I can push on slightly faster...

more epoxy

Image
  I'm now gluing up the 'bilge' and 'sheer' panels - basically the rest of the hull of the boat. Unfortunately one of the puzzle joints was broken so I made a little replacement piece. The last lot of gluing worked fine (it's about 30C in the garage, so it should set!), but there will be a fair amount of sanding ahead...

Epoxy

Image
  First glue joint. The floor panels were supplied with 'puzzle joints' and were very easy to glue up, and no alignment was needed (or possible). I did some calculations on the epoxy. One squirt of resin was 35g, and one of hardener was 15g, so it wasn't quite right (should have been 16g of hardener). I might get a small set of scales for the workshop. I thickened the epoxy with 5g of cab-o-sil, and used 30g of this in this first joint - the remainder will sit in the bottom of the yoghurt pot (I've been saving these) until it sets (fingers crossed...). I will give it 24 hours. For the next gluing session I will do more panels at the same time to reduce waste.

Unpacking

Image
I've unpacked the two boxes. Everything's here including wood, epoxy, fibreglass and all the fittings. The kit included a drain plug for one bulkhead, and a hatch cover for the other (unexpectedly). All the wood is marine ply, spruce (carlins, seat slats) or mahogany (rub rails). I ended up with a huge pile of cardboard from the packaging. The boat is quite big. I know exactly how big from all the photos, plans etc., but it now looks especially big in my garage. I have set up a long 'bench' down the middle of the garage - basically some lengths of 2" x 4" wood clamped between some saw benches. I have dry fitted the floor (base, bottom) of the boat and there is just enough room.  I may have to 'borrow' some space from the end cupboard if I want to get around the ends (stern...bow..) at all. The first step is going to be gluing the two halves of the floor together - my first adventure with resin, hardener and cab-o-sil (I think that is what's in one

The kit's arrived

Image
  Two packages...unboxing next!