Posts

Getting out and about...

Image
  The boat is getting out and about a bit more now. I've had a couple of trips to the Jubilee river and the Thames and had a chance to explore further north on the Grand Union Canal, Many thanks to the Monday Paddlers on Chiltern Canoe Club!

A few trips out

Image
 The boat has been out for a few trips now (mostly on the Grand Union Canal), and is holding up well. It is a lot quicker than the white-water kayaks, but unsurprisingly has a much bigger turning circle. It still wants to go in a straight line even if ii is tipped over on its side a bit. I have made a couple of small modifications - some foam support for hips and thighs, a revision of the foot pegs (to allow for easy replacement or resizing), and finally a front bulkhead with a round, opening access hatch. The foot pegs are 3D printed in PETG and have a base bolted to the bulkhead and a top that presses on, which can be of different sizes.

Launched!

Image
A smooth launch today - the kayak handles nicely, and I now know where I need to put some foam padding.  

The (more or less) finished article

Image
  Launch next...!

Some final details

Image
 The third (last!?) coat of varnish is dry and I am now doing some of the final bits and pieces. I have made the carry handles for the front and back and fitted the foot rests. I have fitted the back support and also epoxied on a couple of small walnut blocks to hold the deck hatch safety line. It should be ready to launch now, but I will still need to make and fit some foam knee pads and maybe thigh and hip supports. It will also need a spray deck and a paddle! I also plan to add an elastic net in front of the coaming (for water bottles etc.) but I will do this a little later.

Deck Hatch

Image
  Here is the deck hatch with the paracord handle fitted.

The first coat

Image
  I have applied the first coat of varnish to the deck - here is the view from the stern. You can also see the rear bulkhead (with its drainage hole) and the foot rest supports from this angle.

Ready to varnish

Image
  Well, everything is now installed (foot brace supports and back support anchor points) so I have sanded the outside of the boat to 120 grit, and had a massive clear up in the garage to reduce the dust to as low a level as possible. The next step will be to apply 2 or three coats of yacht spar varnish to the outside. I will probably leave the inside as it is as this shouldn't get much UV light.

Changing my mind

Image
  I have spent a couple of days making a wooden seat for the kayak, and today I tried it for size. It's quite comfy, but I am not happy with the weight of it (too much) and the fact that it means I will sit a little too high. So I am going to set the wooden seat aside and buy a kayak seat cushion, made from silicone, and put this directly on the bottom of the boat. If this doesn't work out, I can always revert to the wooden tractor seat, or maybe make a light weight one from fibreglass...

Getting closer

Image
  The hatch is now pretty much done, and I have installed a rear bulkhead. The only significant work remaining is the seating and the finishing process (lots of sanding and then varnishing). Here is a current view from the bow and stern of the boat.

Cutting a hole in the deck...

Image
I made the decision to include a deck hatch, and cutting it out was a bit daunting! In the end, I made an oval template in some plywood and used a router with a narrow bit - this way I was able to use the cutout as the hatch cover. I made the magnetic closure in the same was as this Laughing Loon video. Here is the internal rim (made from heat-bent walnut) being fitted.  

Taping the outside seam

Image
The inside seams went OK but it was not much fun. Lit with a torch, the  process involved having your head stuck inside a kayak while trying to sort out laying a sticky glass fiber tape flat using a paintbrush taped to a long stick. Also the seams crept apart a little during the process which has meant using a bit of epoxy filler on the outside. Here is the first outside seam being installed, which was much more enjoyable. I have done the seams in four sessions, rather than trying to get the pairs done at once, and I'm glad I made this choice, otherwise it would have been way too messy!

Joining the two halves together

Image
  Here are the hull and deck taped together ready for the internal taped seams. This is a bit of a fiddly process as a roll of epoxy-soaked glass fibre tape has to be unrolled right down to both ends of the boat on the inside (torch and paintbrush-on-a-stick at the ready).

Making the coming lip

Image
  I have now glued on the coming lip (using most of my clamp collection). This is made of thin walnut strips clamped to the coming. I'm not sure how deep the lip needs to be - I don't want the spray skirt to 'ping' off too easily, but it does need to come off in case of a capsize. I can always modify it once I have a spray skirt to test out.

and the inside of the deck

Image
 This is the last major piece of fibre glassing - the inside of the deck. I trimmed the bottom of the coaming first with a saw and then an electric file - not a very enjoyable job, but it came out OK, I think.

Glassing the deck

Image
 Here is the deck after two coats of epoxy onto the glass fibre cloth.

Inside of the hull

Image
I have now fibre-glassed the inside of the hull; a single layer of the 125 g/sqm, with an extra patch of heavier cloth where my feet will go.  The beam is still OK at 61cm (even if the photo makes it look a bit squashed!). Once the epoxy has set, the hull should be more or less done...hurrah. I have made an error of my epoxy quantities, and I will need to buy another 3kg... more delivery costs!!  

Glassing the hull

Image
  I have now started the process of fibre-glassing the hull. I have used two layers of 125g/sqm (4oz) glass, and both epoxied at the same time. After applying the 'wetting out' coat with a wooden spatula (probably a poor choice!), I applied two top coats using a foam roller. My objective is to just cover the weave of the cloth...

Back to the hull

Image
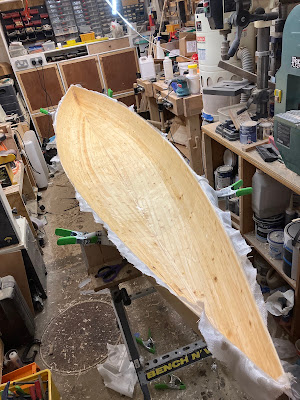
  I have flipped the hull again and sanded up to 120 grit, ready for glassing. The deck has had to be put out of the way, and is a bit precarious balanced on top of the drill press!

Starting to look like a kayak

Image
  The deck is now just about done, and I have cut out the cockpit and also fitted the walnut bow stem. The cockpit coaming is also to be made from walnut, and I have made a start on this now.